Tuesday, November 19, 2013

Leilani Joy's Birthday Card Design Contest!


Contest Rules and Details:
  1. Any subject matter is welcome- but remember that it's a birthday card design!
  2. Only one entry per person
  3. Any medium is allowed
  4. Please send a small JPEG image to Admin@LeilaniJoy.com with your name and details
  5. Your submission MUST be received before MIDNIGHT on Monday November 25th 2013. (so the end of Nov. 25th)
  6. You need to design the front (cover) of the card only. You don't need to design the inside or back of the card.
  7. Winner will receive an awesome Leilani Joy Prize pack that includes: A signed 11x14"print of the winner's choice, a postcard set, a holiday card featuring "Magdalen and Magi"- and a pin back button! 
  8.  HAVE FUN AND BE CREATIVE! 
  9.  Please direct contest questions to Admin@LeilaniJoy.com

Wednesday, October 30, 2013

Developing Your Own Drawing Style!

A lot of people ask me about how to go about developing their own unique drawing style, and I came across this great (if not a little... wordy...) tutorial on developing your illustration style by fellow YouTube artist Sycra (https://www.youtube.com/user/Sycra) The following is a fantastic exercise for those who are looking to develop a unique art style.


He makes some really great points in this video, and I couldn't agree more! A few hightlighted points to consider when developing your own style....
  • Always master the foundations of realistic drawing first!
  • Experiment with exaggerating characters in unique ways
  • Try lots of different styles
  • Avoid referencing other artists! Reference reality! 
  • Don't learn to draw from the way other artists draw. It will become obvious that your style isn't your own.
  • Stay true to yourself. Every artist has a unique voice. Embrace yours.
Sycra says, "I've seen this a lot- Artists who reference disney styles, like Glenn Keaton's style, or they'll do an Avatar The Last Airbender style-thing and it's very easy to see they copied from the style instead of learning how to draw properly, because you'll see little mistakes show up. More as with foundations, you can push things sooo far."

Sycra also answers one of my most frequently asked questions; "Will you create a video teaching us your artistic style and how to draw just like you?"

Sycra says, "As for people wanting to know how to do my own style- that's something I really don't want to do. And the reason is; I feel at that point THAT is what you create yourself. Right? I don't feel bad teaching foundations, but I wouldn't feel entirely good about teaching how I go about my own version of simplifying reality because that's MY way of seeing things. It's quite individual." 

So check out the video and try some of these things yourself!

AND

 "Remember, inspiration is different than EMULATION. We are all inspired by each other and the things we are exposed to- but your work should become it's own unique manifestation of these things and your OWN interpretation of reality, not someone elses."- Leilani Joy ^__^

Monday, August 12, 2013

Commissions 101


Hi NuVoguers! Leilani Joy here, with your intro to Commissions! There are a few important things that you need to know before you go pro! Do keep in mind that there is a learning curve to this process and it may take you a few jobs and clients before you get the system down. Also remember that every client is a little different and people have different communication styles. As the artist you are providing your creative services and it's important that present yourself in a professional way. These tips and guidelines are just that- guidelines! You'll need to alter these terms and practices to fit your needs and the parameters of your specific project/job. So in this post I'll be covering the following: 


  Click the following links to jump to that section

Pricing and Rates


So you've got yourself a gig! Congratulations! ^__^ Getting a job is often the hardest part! So now you're wondering, "Well....What should I charge?" 

There are a lot of factors involved in art pricing. Obviously experienced artists who are in high demand can charge substantially more than an artist who is just starting out. Jasmine Beckett-Grifith's pieces often go for thousands and thousands of dollars each, but this doesn't mean you're going to start out earning the same thing. She is a good example of an artist who has made a name for herself and built up a strong demand for her work- as well as a high paying cliental. For those of us who aren't quite there yet, there are a few factors to consider. First, ask yourself the following questions:
  •  What is the current demand for my work?
  •  What is the going rate for the job your doing (what do professionals charge?)
  •  How much do I want to be paid per hour? 
  •  How many hours does it take to complete a piece?
So if you're just starting out the demand is probably low- (remember your economics class? What happens when demand increases and supply is limited? Prices go up!) But don't worry, demand will come with time and hard work! 

Next pick up a copy of this book- VERY IMPORTANT if you want to go pro: "Graphic Artist's Guild Handbook of Pricing and Ethical Guidelines" (you can find it on amazon here: 
Buy it now!)


This book will have all the current professional going rates for a variety of creative jobs- from graphic novels, to advertisements, commissioned paintings, greeting cards, book covers, and EVERYTHING in between. This book also has fantastic info on legal matters and other important art biz! Do keep in mind that this book is just a guideline and averaged from seasoned professionals. You may be earning considerably less than the guidelines when you first start out, but it is good to be aware of the standard rates. You can also find some resourceful info here: https://www.graphicartistsguild.org/

Finally- this is very important! Time to put your math cap on... You will need to calculate the number of hours it takes you to complete a piece. From there you want to multiply your hours by your desired hourly rate. 

(HOURS WORKED) X (YOUR HOURLY RATE) = PRICE

If you're charging 100 dollars for a painting, and it took you 25 hours to complete, you're only earning $4.00 per hour! YIKES! That's slave labor! Make sure you're at least earning minimum wage when you're just starting out. Your hourly rate can increase with experience and demand. Remember, artists work just like everybody else does! We deserve to be paid! 


S0 at this point you have a client, and you have mutually decided on the price for your work. Next you want to draft a contract that outlines the project and also includes your terms regarding copyrights, reproduction rights, turn around time, payment, deadlines, etc. Some clients may provide you with their own contract- which you should review VERY carefully. If you have questions be sure to ask your client. If you're creating your own contract then these guidelines will apply to you! The following is a sample contract that I use for my own commissions. I've made some notes in red to explain some of the terms. I have revised my contract many times and you will you want alter it to fit your own projects.

I'm going to share with you two different types of contracts that I use. One is for a basic commission for an original painting (which is usually for a private individual client) and the other is for a more elaborate multi-illustration assignment for a freelance project, that could be for a company etc. 

Basic Original Painting Commission: 

Click to Download Text Version of this contract
Multi Illustration Assignment:

Click to download a text version of this contract


So now it's finally time to do some drawing! First you want to determine how many thumbnails to provide your client, and make sure you include that in your work agreement. I typically send the client 4 and 6 depending on how complicated the illustration is- but that doesn't mean that I don't do more. Sometimes I'll do up to 10 or so and then send my client the strongest 4. Don't be afraid to do as many thumbnails as you'd like. I also like to do my thumbnails to SCALE of the final piece. That way your compositions will match when you move to the final stage. You may have to use some math skills to create your scale thumbnails but it's worth it! 

Work fast and loose and just let the ideas flow freely! Most clients don't need thumbnails to be too acurate- focus on big basic shapes and a pleasing composition at this stage. Here's some examples of thumbnails I've done for my clients. :-)


COLOR COMPS AND SKETCHES

Once my client has chosen a their favorite thumbnail I begin the next stage. From here I start looking for photo reference or shoot my own to work from. Then I begin on a more refined sketch for the final piece. Once finished with the sketch I will send it to my client for review and approval and make any requested changes. For my commissions I only provide one round of revisions to the sketch. If more changes are requested I charge an hourly rate for additional work. This may be something you should include in your contract- some clients can be "nit picky" and it's important that you be paid for your work. When clients know they have to pay more for additional changes they are more inclined to keep them to a minimum and less likely to take advantage of your time. 

So once we've agreed on the final sketch, I'll begin my color comps. I usually scan my developed sketch and work up some color palette thumbnails aka color comps. Many times the client will have input as far as what colors they would like for their piece- in that case two color comps may be sufficient. I usually do 4 color comps, just to provide them with a few different color ideas. 


If I'm feeling stumped for color inspiration- I'll often create color palettes from other artworks or photographs. Remember- there are no copyrights on color ;-)


FINAL PRODUCT AND SHIPPING


Almost there...... Just have to actually do the painting! :-P  

 Once I begin the final piece, I provide my client with a couple of progress shots along the way. Once I near the completion I offer my client one more round of revisions if needed, but usually by this point we already have the final piece planned out and few revisions are necessary. 


***Remember to watermark your final illustration and only send a LOW-RES proof to your client- especially if they haven't paid you in full yet! You don't want your client canceling the job at the last second and printing off your digital file of the final piece to so they can hang it up in their house without paying you!!!(I only say this because it COULD happen) EEK! Always protect yourself and your artwork!


Finally, pack your painting carefully and ship it to your client! Remember to either calculate  your shipping costs and include it in your total rate- or collect it separately from your client before shipping! If you're not confident in shipping your original painting safely, best leave it to the professionals! I've had some of my more delicate pieces professionally packed and shipped to ensure they are arrive safely. I like using a company called, Box Brothers (http://boxbros.com/) They have locations all over CA, and also in FL, WA, TX, and NV. You can also ship with FedEx, but unfortunately FedEx only ensures packages up to $500, so if your piece is worth more than that you may want to find another service. 


BE SURE TO PURCHASE INSURANCE before you ship!!! I know it seems annoying to pay for insurance but trust me you don't want to ship without it. If by some chance your painting is lost or damaged it would be heartbreaking to have to refund your client and be left with no painting and no money! So be sure to get full coverage on your artwork! 

Now that your done.... Rinse and repeat! You'll be a pro in no time! 

<3 L

Saturday, August 10, 2013

Watermarking 101

Hey guys! Today we're gonna talk about watermarking! I've recieved a lot of questions about how to do this and why so I'm here to clear things up! It's super easy to do and a great way to protect your artwork online.


Here are links to some online watermarking sites:


http://picmarkr.com/
http://www.watermark-images.com/
http://www.umarkonline.com/
More watermark software and websites: http://louisem.com/1912/free-watermark-software-watermark-online

Examples of Watermarking:

 "Alice" by Leilani Joy
Artwork by Jasmine Becket-Griffith
Artwork by Carissa Rose

Deposit Photos Stock

Thursday, July 25, 2013

Evolution of The Female

Looking for inspiration for your female characters? I stumbled upon this beautiful video by Maxronanido (directed by Lena Nosenko) on YouTube that shows the progression of female fashion and ideals of beauty. It might give you some cool ideas for placing your female characters in different time periods. Also the music is lovely.... Enjoy!


Tuesday, July 16, 2013

Sunday, June 23, 2013

Recipe of a Pretty Girl!

One of the most common things I get asked for advice on is about how to draw faces.... and not just faces.... but pretty faces! So what's in a pretty face? Well... I've got a recipe for you! Big thanks to http://toonsketchbook.tumblr.com for this fantastic instructional image! It's always best to work from real life photos, but this demonstration gives some great tips on what to look for when making your own pretty girls! No matter what style you work in these general rules will help you make some glamorously gorgeous gals! xoxo L


Wednesday, June 12, 2013

10 Acrylic Painting Tips for Beginners


Hi guys! I thought I'd share with you this great and useful guide to acrylics for beginners by, Marion Boddy-Evans. Marion shares some great basics for Acrylic beginners and I thought I'd share these techniques with you guys!

Acrylics are extremely versatile, fast-drying paints, and can be used straight from the tube like oils or thinned with water or a medium and used like watercolors. And a lot in-between. Here are a few tips to help you get started painting with acrylics.

 Tip 1: Keeping Acrylic Paints Workable
Because acrylics dry so fast, squeeze only a little paint out of a tube at a time. If you're using a 'normal' plastic palette invest in a spray bottle so you can spray a fine mist over the paint regularly to keep it moist, and thus usable. 'Stay-wet' palettes – where the paint sits on a sheet of wax paper place on top of a damp piece of watercolor paper – eliminate the need to do this, but generally don't have a hole for your thumb so are more awkward to hold in your hand.

 Tip 2: Blot your Brushes
Keep a piece of paper towel or cloth next to your water jar and get into the habit of wiping your brushes on it every time you rise them. This prevents water drops running down the ferrule and onto your painting, making blotches.

 Tip 3: Opaque or Transparent Colors
If applied thickly – either straight from the tube or with very little water added – or if mixed with a little titanium white, all acrylic colors can be opaque. If diluted, they can be used like watercolors or for airbrushing.

 Tip 4: Acrylic vs Watercolor Washes 
When an acrylic wash dries, it's permanent and, unlike a watercolour wash, is insoluble and can be over-painted without fear of disturbing the existing wash. The colors of subsequent washes mix optically with the earlier ones. A watercolor glaze can be lifted out using water and a cloth.

 Tip 5: Think Thin When Thinking Glazes
If you want transparent glazes, these should be built up in thin layers, so the colors beneath show through. Use the brush to spread the paint out thinly across the surface.

 Tip 6: Improve Flow Without Losing Color
To increase the flow of a colour with minimal loss of color strength, use flow-improver medium rather than just water.

 Tip 7: Blending
Because acrylics dry rapidly, you need to work fast if you wish to blend colors. If you're working on paper, dampening the paper will increase your working time.

 Tip 8: Hard Edges
Masking tape can be put onto and removed from dried acrylic paint without damaging an existing layer. This makes it easy to produce a hard or sharp edge. Make sure the edges of the tape are stuck down firmly and don't paint too thickly on the edges, otherwise you won't get a clean line when you lift it.

 Tip 9: Washing-up Liquid with Masking Fluid
Masking fluid or frisket can be used with acrylics washes, as well as with watercolors. Be sure it's completely dry before you paint over it, and don't paint too thickly over it or you'll have to scratch away the paint to get to the masking fluid. Masking fluid will work on paper and canvas, but do try it out first before using it in a painting to get a feel for it. Once masking fluid has dried in a brush, it's nearly impossible to remove. Dipping a brush into some washing-up liquid first makes it easier to wash masking fluid out of a brush.

 Tip 10: Using Acrylic Paint as a Glue for Collage
Provided it's used fairly thickly and the item to be stuck isn't too heavy, acrylic paint will work as a glue in a collage. Simply apply some to the surface, like you would glue.

Tuesday, May 28, 2013

Feeling Color Blocked?

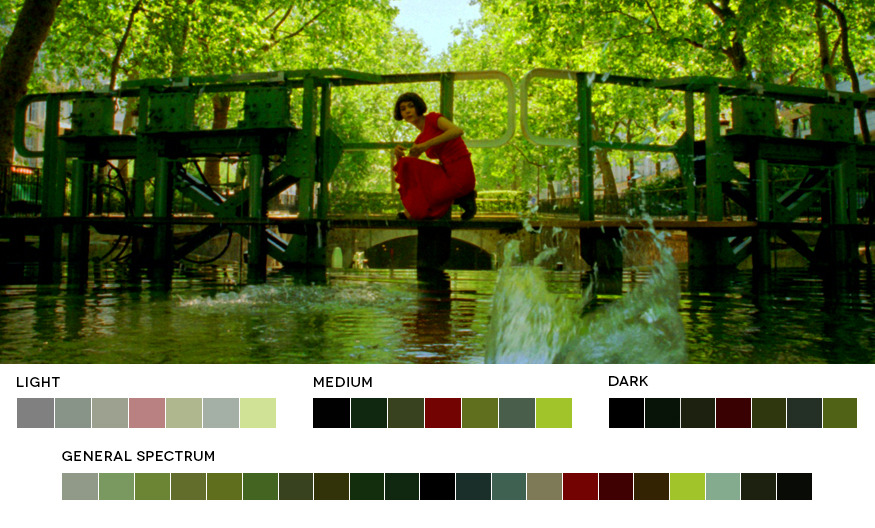
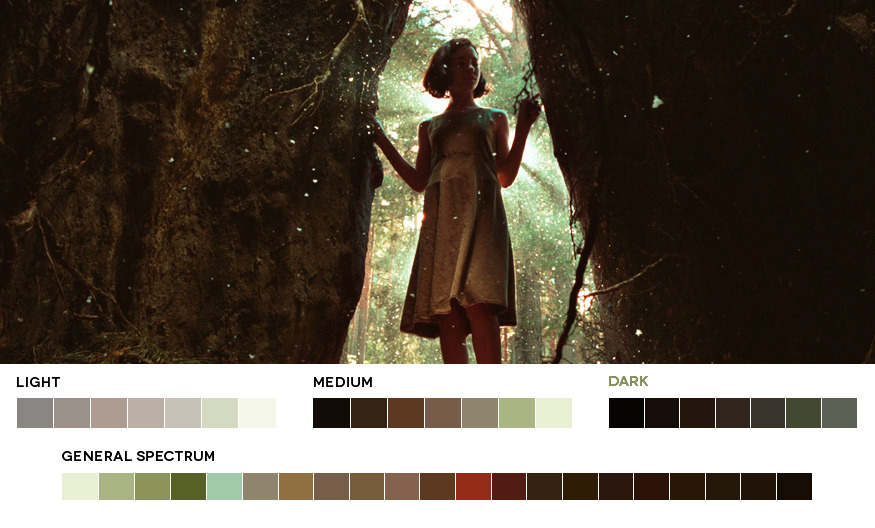
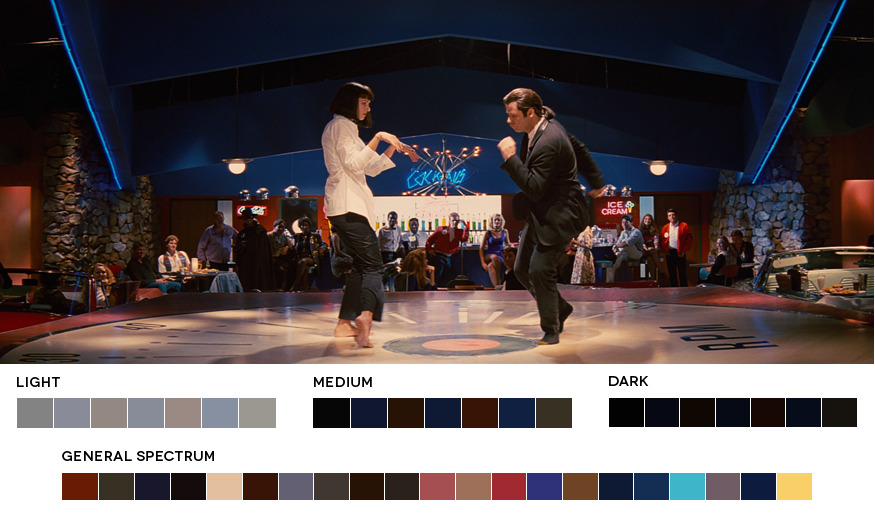
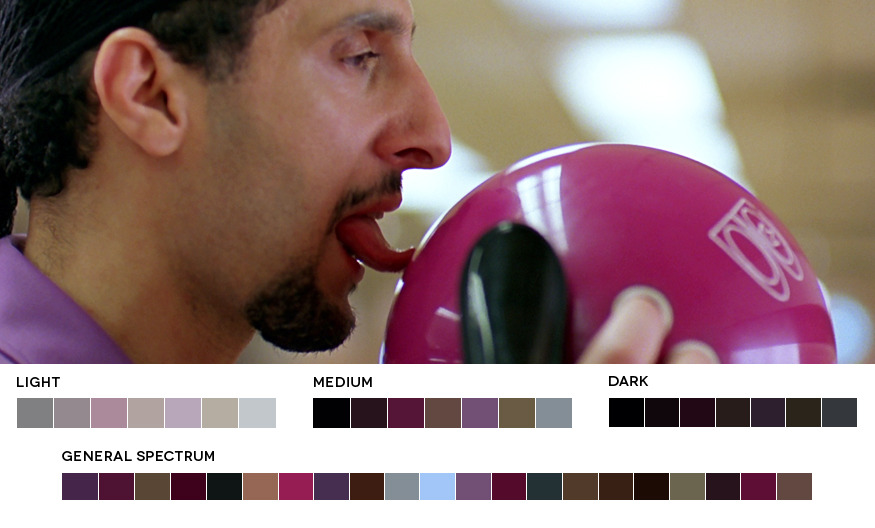
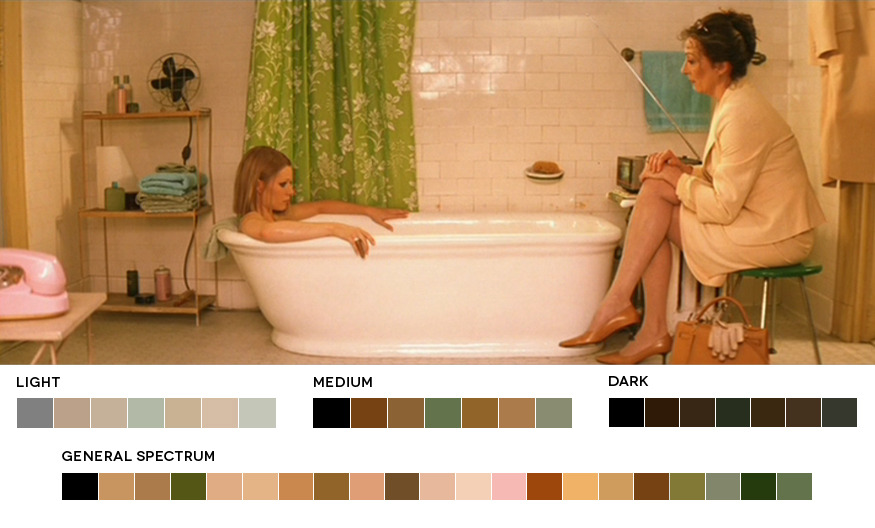
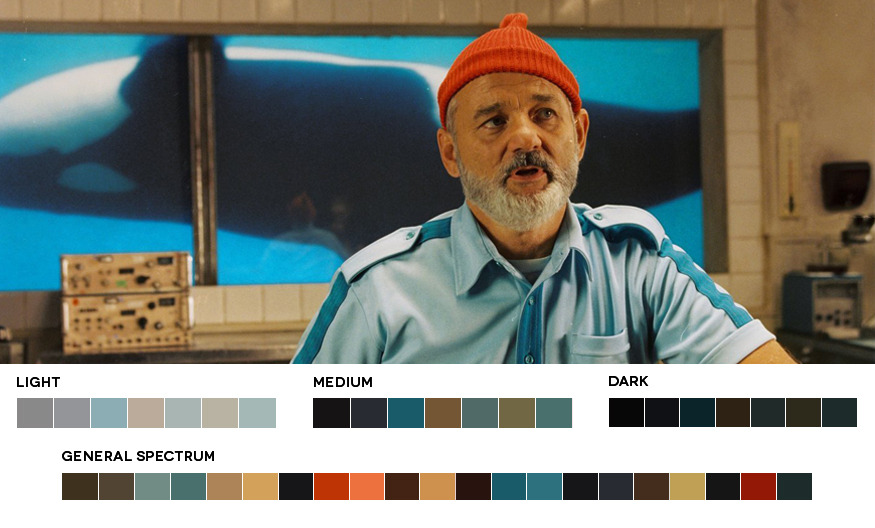
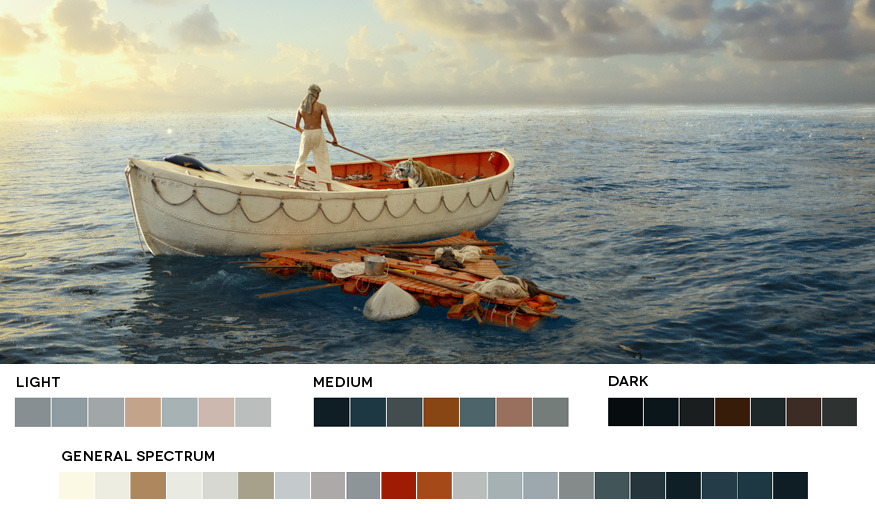
Have you ever felt afraid of ruining a great drawing with the wrong colors? Are you in need of some color inspiration? I have just the place for you! I recently stumbled upon a fantastic blog called, "Movies in Color," on Tumblr: http://moviesincolor.com

This blog breaks down and simplifies the color palette's of some of the most beautifully shot films. You can easily see how color affects mood and story telling in these screen caps. Check out some of my favorite examples:

Jean-Pierre Jeunet Week
Amelie, 2001Cinematography: Bruno Delbonnel

Request Week - Jake B.
Pan’s Labyrinth, 2006Cinematography: Guillermo Navarro
Quentin Tarantino Week
Pulp Fiction, 1994Cinematography: Andrej Sekula
Coen Brothers Week
The Big Lebowski, 1998Cinematography: Roger Deakins

Wes Anderson Week
The Royal Tenenbaums, 2001Cinematography: Robert D. Yeoman

Wes Anderson Week
The Life Aquatic with Steve Zissou, 2004Cinematography: Robert D. Yeoma


Oscar Nominees WeekLife of Pi, 2012Cinematographer: Claudio Miranda

See lots of more of these incredible movie color palette's at: http://moviesincolor.com

xoxo L

Thursday, May 16, 2013

FAQs

Leilani Joy's Frequently Asked Questions!

Hey there NuVoguers! Welcome to my frequently asked questions! Thanks for stopping by! I'll continue to update this entry as I answer new FAQs. 
xoxo L

FAQ SECTIONS: 
Click the following links to jump to that section
Q: What materials/brands do you use for creating your artwork?

A: I use a variety of materials in creating my artwork and I'm always looking to experiment with new ones. Mostly I use Liquetex, Golden, and Windsor & Newton acrylic paints and Windsor & Newtown watercolors. People often ask about the brands of my materials- however I'm not exclusive to any one brand. I try to buy the best I can afford, but sometimes I do buy what's on sale. With that said, some brands ARE better and more reliable than others, however I don't believe brands make better artists. My brand of pencils, sketchbook, and ink have little effect on my style of drawing. I encourage all my fellow artists to experiment and find what works best for themselves. When you're a student, or just learning feel free to buy the cheap stuff! Then you can experiment and not worry so much about wasting expense paint! For a full explanation of my materials, check out my Tools of the Trade Video: 


Q: Are you a self-taught artist or did you go to art school?

 A: I have an AA in Applied Art and Design from a junior college and I received my Bachelor of Fine Art in Traditional Illustration from the Academy of Art University in San Francisco in 2009. Though I do have a formal art education- I believe my style and the way I create art work is self-taught.

Q: What inspires you to create your art?

A. Anything and everything honestly! I never know exactly where it’s going to come from. Sometimes it’s song or film I saw or sometimes I dream I had. Many of my pieces are inspired by existing characters that I want to do in my own style, like Alice in Wonderland or Madame Butterfly. I’m also inspired by (or perhaps obsessed with) Rorschach ink blot tests. I love seeing something in them and working them into my pieces. Someone recently referred to my characters as “Ink Blot Girls” and I totally love that description so I’m thinking of calling my character’s Leilani’s Ink Blot Girls!


Q: How do you ACTUALLY make a living?

A. I own and operate an illustration and fine art business, create and teach my own online art courses, and share my creative process via my art vlog on YouTube. I create my own original artwork and produce products such as prints, accessories, apparel, and more featuring my designs. My originals are often displayed and sold through galleries, and/or I sell my own products in my online store. Since 2012, I've worked with Disney's WonderGround Gallery creating officially licensed works featuring their characters in my own style. They offer my works on a series of products and I receive royalties on all products sold. I also license my works to other companies and product lines such as Modify Watches, GeckoRouge, and Society6. I also take on freelance and commissioned work in conjunction with selling my own personal work. I work with a clients, such as to create custom artwork and provide them with design services. I control almost every aspect of my business from self promotion, social networking, package design, shipping products etc. 

Q: How did you become a professional full time artist?

To be honest, I started this business somewhat by accident. I always planned on being a professional artist in some capacity but I was never sure exactly what that meant. I attended the Academy of Art University where I received my degree in Fine Art: Illustration and although I gained valuable art and design skills I didn’t learn much about the business of being an artist.

 Upon graduating from art school I worked two office (and extremely non creative) day jobs to make ends meet. I painted late into the night from a tiny little bedroom in a San Francisco apartment that I shared with 3 other girls. In 2009 I made my first painting process video and posted in to YouTube. I was surprised when I began getting positive feedback and emails from people asking if they could purchase the work from the video. After a few more videos and little more confidence I opened a shop on Etsy- and with the help and support of my parents I began taking my work and few prints to any art/craft/comic con/street fair/ event I could get into. I started doing better and better at each show and slowly but surely I had more work to take to each new show. Over about 3 years I slowly built my following and customer base both online AND in real life. I still have long time fans and collectors from some of my earliest arts and crafts street fairs.


 Me and my mama at one of my first ever art fairs! 2010.
In 2010, I made the decision to move back in with my parents (with their full support) and focus on my art career 100% full time. For 2 full years I was able to devote myself entirely to creating new art, videos and seeking commissions and freelance work as well. By 2012, I was able support myself doing art full time and I moved back to the San Francisco Bay Area. It took several more years for income to become somewhat stable, and I've continued to work extremely hard and grow my business more and more each year! 


Q: Why do you only paint girls? Why not men? Or animals etc?

A. 
Artists tend to paint what inspires them and I am inspired by female characters and the female form. My artwork is also a business for me, and early on I found that portraits of males did not sell as well as my females. I often do men/boys in my freelance work and have done some for fashion illustrations as well. I don't generally paint males for the same reason I don't paint landscapes, pet portraits, or still lifes- It just isn't my thing. However, I'm always up for a challenge so if you are interested in commissioning a boy painting, I'd be happy to take on the task! ^___^


Q: Who are your artistic influences?

A. 
Oh there are SO many! Camilla d’Errico is big one for me- not only for her amazingly beautiful work but also her incredible tenacity and ability to brand herself and market her work. I’m also very inspired by Erte, Alphonse Mucha, David Downton, Stella Im Hultberg, Stina Persson and CLAMP. I grew up on Sailor Moon and The Last Unicorn and I think there is a lot of animation and anime influence in my work as well. I admire many different artists and styles so it's tough to figure out which ones I'm most influenced by.

Q: I have an idea for your next piece on Art NuVogue! Will you do it for me?

A: Unfortunately I'm unable to take on uncommissioned requests. It would simply be impossible for me to meet them all :-( However if you're interested in commissioning a custom piece you can find all my information on commissions and rates on my website here, http://www.leilanijoy.com/Commissions or you can email


Sales@LeilaniJoy.com 

Q: Most of your work is stylized or "cartoony" is it because you can't do realism? Will you ever do anything more realistic?


A: I have a Bachelor of Fine Arts from the Academy of Art University- I don't think they would have let me skate by doing only anime/manga/fashion illustration style paintings. Haha! Just because I choose to work in a style that makes me happy does not mean I CAN'T or HAVE NOT worked in various styles and techniques. In fact most of my college work is a variety of photo realistic drawings, paintings and even sculptures. Actually, I'm a firm believer that learning the classical techniques of the masters is VERY important! It's only when you know all the rules, that you can bend or even break them. I have been trained in the techniques of the "masters" and studied form, composition, chiaroscuro, perspective, figure drawing and sculpting, anatomy, color theory, still life painting, fine art portraiture etc. I have painted a variety of subject matters and with a variety of tools.  At this point in my career though I'm more interested in exploring my own unique personal style of illustration than refining my realistic rendering skills. With that said- I still think my knowledge of the foundations comes through, even in my stylized work.

Q: Why do you hold your pencil that way? It's wrong!

A:
 People have been telling my I hold my pencil "wrong" as long as I can remember- as far back as kindergarten I guess? It's just the way I do it. As long as I can write/draw the way I want- I don't see what difference it makes. In art school I was taught the "proper" way to hold a drawing tool and paint brush, but ultimately I like doing it my way. Maybe I'm just unique? ^__^ The incredible artist, Chuck Close, paints with a paintbrush held in his mouth since a stroke disabled him from using his hands. Another artist that I greatly admire, Marilyn Minter, often paints with her fingers and hands only. I think art is one of the few things that has no "RIGHT" way. However you wish to create is the RIGHT way for you! 
Q: Do I have to go to Art School to be a professional Artist?

A: This question is a controversial one, and ultimately you'll have to make this decision for yourself. It's different for everyone but the bottom line is- take a look at your competition. While we all should embrace a unique style, it's important to note what's already out there and ask yourself- can I compete with the artists who are doing what I want to do? If you think you have the skills to be seen as an equal with professionals in the field then you're good to go and go for it! However, for most of us need the guidance of good instructors to master the important foundations of design, drawing, anatomy, color theory etc before we can go out into the professional world. It's not to say you "CAN'T" be successful without formal training, but let's just say you need to be REALLY GOOD at what you do. Practice is definitely a MUST to improve, but you can practice ballet all you want in your bedroom but without an instructor telling you HOW to practice, you're going to get stuck making the same mistakes over and over. Art school was the right choice for me because I never felt my natural talent was enough to get me where I wanted to be. I stay true to myself in my artistic style, but my learned knowledge of basic artistic principles and foundations has helped me grow more than I could have on my own. Don't get me wrong, art schools are VERY expensive and now with online education there are alternatives to the traditional "art school experience." In fact, I've created my own ONLINE ART SCHOOL because of this! If you'd like a crash course art school experience please check out my online course, "The Art School Express: A Fast Track to a Professional Art Portfolio." 


Whether or not you enroll in my course, I definitely encourage you to seek out education even if it's at your community college, local workshops, online training courses etc. You may be the most talented artist at your school now- but learning the foundations will give you an edge over most untrained self taught artists. If you're unsure of where you stand- it's a great idea to get a professional opinion. If you want to work in video games doing concept design for example; find some professionals or a company who will look at your work. Many times professionals and companies are happy to give you an honest opinion. If the comments come back that you need to work on your composition and anatomy, you may want to seriously consider some formal art education. The best way to find out where you stand is to put yourself out there- if you're confident you don't need art school then start applying work illustration jobs or selling your fine art online. The best indicator is often public opinion which will give you a good idea of where to go from here! Good luck!

 Q: Is it ok if I paint my own copies of your work?
A: You are welcome to do fan art or pay tribute to my style, I only ask that it be for entertainment only (none of my work may be reproduced with intent to be sold or distributed) and ALSO that you fully credit my ideas, characters, and style by having my name clearly visible wherever you post your inspired works. Anything outside of this would be a violation of my copyrights. It's always flattering when another artist requests to emulate me, but I strongly encourage all new artists to embrace what makes them unique and to always strive for authenticity and originality. If there is already an artist out there doing something, find a way to be different from them while still being inspired. 


Q: I'm an aspiring artist! Will you please critique my work and/or portfolio?


A: TAKE MY ONLINE CLASS! The Art School Express: A Fast Track to A Professional Portfolio! I am always incredibly flattered to hear I've inspired other artists and I sincerely wish I could critique and mentor all those who message me, but unfortunately I often receive hundreds of emails requesting art critiques that I simply can't get to them all. Because of this I've created a comprehensive online art school experience where I critique and mentor aspiring artists and guide them toward a more professional portfolio. To learn more or enroll, visit www.ArtNuVogueU.com


Q: I want to draw better? What should I do to improve?

A: Depending on your age or level in schooling- I highly suggest taking a formal class in still life drawing, figure drawing and/or fashion illustration. It's pretty difficult to self-teach yourself the basic principles of classical drawing and the best way to learn is to work alongside someone who can show you in classroom situation. If you aren't at a point where you can enroll in college courses- sometimes communities offer drawing workshops for all ages. Finally the best thing you can do is pick up some books on drawing anatomy- there are tons of great ones out there. Try and art store or Barnes and Noble. Then just practice, practice practice! It's the best and only way to improve!

A word of caution- AVOID LEARNING TO DRAW FROM OTHER ARTWORK. DRAW FROM LIFE OR PHOTOS. It's very important to learn the correct principles of real life drawing before you can stylize them- "Learn the rules, before you bend or even break them." Studying the artwork of others and emulating them can be a good learning exercise, but you run the risk of just learning to "copy" not learning to draw- and not only that, it soon becomes obvious that you learned to draw from another artists style and run the risk of constantly being compared to that artist, or possibly violating their copyrights. (see example below) 


As you can see, the artist on the right was studying Jasmine's piece as reference for her own piece, which looks dangerously similar, possibly even traced. To protect yourself and stay on the safe side- Only create work that it 100% yours! Don't ever trace or copy directly from another artist. Inspiration is fine, but remember to use it as just that, inspiration! Reference is vital, but remember that unless you use your own photographs you also run the risk of violating the copyrights of a photographer if you copy too closely. Use reference as reference but most of all tap into your artistic skills to make the reference unrecognizable. For example: 
I used this photograph of Natalie Portman for W Magazine as a reference for the pose in my "Flora" piece. When they are side by side you can see some resemblance, but the final piece is very different from the photograph. I made it my own using my own unique style and artistic license. There is very little of the photograph in the final product. Keep this in mind when using reference- and use sparingly! If you want to do hyper realism style art, I would HIGHLY suggest taking your own photographing and only using those as reference.

Q: I suffer from artist block and worry my art will turn out badly. How do you deal with this? 

 A. My best advice is to JUST DO IT. It’s sounds cliche- but you can’t succeed if you don’t even try, right? It’s true- you may do tons of pieces you hate at first but just keep going because for every piece you do (even if you hate it) YOU WILL learn something from it. You may say- “I don’t like the style of my drawing” or “I don’t like color scheme on this one” ….. So do it differently the next time! There is no reason you can’t do another piece, right? Finding your artistic style and getting into a creative “groove” takes a lot of trial and error, and often some blood, sweat and tears. Even well established artists struggle often and question themselves. I know I do- ALL THE TIME! I always strive to outdo myself on my next piece and I’m always looking to improve along the way. I hope you will too! Also! 


Q: Help! I just cant get inspired, any suggestions? Where do you get your ideas?!
 A. It's true- sometimes we just aren't "into it." It happens. Sometimes you need to take a break from trying to force inspiration. Try another creative outlet- creative writing, dancing, singing, sewing, writing music, or even just watching films. Take the pressure off and draw blindfolded or with your opposite hand. If the expectation of creating a good piece is lifted- you'd be surprised what can come out of it. If you're still stumped for inspiration check out this post, "33 Ways to Stay Creative," There are some great ideas here, many of which I use often! http://www.artnuvogue.com/2013/04/33-ways-to-stay-creative.html
My ideas come from all different sources and in all different ways, but mostly they come from my personal life experience and things I'm exposed to- so I can't really say exactly where they all come from or pass on my source of ideas to others. If you're truly stumped, try exposing yourself to new experiences! Step one! Get off your phone or computer! Go outside and take in the world around you. Spend the day in the library, go to an art museum and do something outside your comfort zone! That should get inspiration flowing! 


 Q: So what's your "day job?" How do you ACTUALLY support yourself?

 A: I am 100% a FULL TIME artist, illustrator and business owner. In fact, I would say I work the equivalent of about 8 day jobs; Artist, Administrator, Accountant, Web designer, Marketer, Shipping & Packaging Specialist, Filmmaker and Video editor, and often factory worker! Ha! But seriously, if you want a full time artist career- Be prepared to give up your evenings watching TV, and many of your weekends. Being a professional artist is more than a full time job, it’s a way of life. I’m pretty much a one woman show at the moment. I do all the paintings, do all the shipping, maintain all my websites and social networks, and run my art store business. Before I was able to do art full time, I was working two jobs and painting late at night and on weekends to get my business started. I’m willing to devote myself 100% because I feel so passionately about my artwork. I'm a firm believer that you can support yourself doing just about anything if you are willing to work for it. 


Q: I've seen that you do Disney work for WonderGround Gallery? How do I get my work into this gallery? Any advice?

A: Disney's WonderGround Gallery© selects their artists using an “invite only” process. Regrettably, I'm unable to give out direct contact information for WonderGround Gallery or any of my Disney contacts or representatives. To increase your chances of being contacted by WonderGround Gallery, or any other prominent art gallery- my best advice is to work your hardest to create a unique personal style and brand! WonderGround Gallery seeks artists who are unique from one another and feel their styles would adapt well to their brand. I also encourage artists interested in working with Disney to avoid doing art that may violate Disney copyright. It may sound counter intuitive, but drawing Disney characters without permission from the copyright holder may actually hurt your chances of working with them in the future. They are very protective of their properties, so I strongly encourage artists to stick to original characters and subjects to stand out from a sea of Disney fan art.

Q: You say your work is copyrighted. Do I need to copyright my own work?

 A: I have a great blog post that goes into detail about Art and Copyrights. It's very important that you learn about what copyrights are and how they work for artwork. You can find all that info and answers to other common copyright questions here: http://www.artnuvogue.com/2013/02/art-and-copyright.html


Q: How much should I charge for my artwork; paintings, commissions, freelance etc?

 A: This is a tricky question- yet a good one! First of all there are a lot of factors involved in art pricing. Obviously experienced artists who are in high demand can charge substantially more than an artist who is just starting out. Jasmine Beckett-Grifith's pieces often go for thousands and thousands of dollars each, but this doesn't mean you're going to start out earning the same thing. She is a good example of an artist who has made a name for herself and built up a strong demand for her work- as well as a high paying cliental. For those of us who aren't quite there yet, there are a few factors to consider. First, ask yourself the following questions:


  •  What is the current demand for my work?
  •  What is the going rate for the job your doing (what do professionals charge?)
  •  How much do I want to be paid per hour? 
  •  How many hours does it take to complete a piece?


So if you're just starting out the demand is probably low- (remember your economics class? What happens when demand increases and supply is limited? Prices go up!) But don't worry, demand will come with time and hard work! 

Next pick up a copy of this book- VERY IMPORTANT if you want to go pro: "Graphic Artist's Guild Handbook of Pricing and Ethical Guidelines" (you can find it on amazon here: Buy it now!)
This book will have all the current professional going rates for a variety of creative jobs- from graphic novels, to advertisements, commissioned paintings, greeting cards, book covers, and EVERYTHING in between. This book also has fantastic info on legal matters and other important art biz! Do keep in mind that this book is just a guideline and averaged from seasoned professionals. You may be earning considerably less than the guidelines when you first start out, but it is good to be aware of the standard rates. You can also find some resourceful info here: https://www.graphicartistsguild.org/

Finally- this is very important! Time to put your math cap on... You will need to calculate the number of hours it takes you to complete a piece. From there you want to multiply your hours by your desired hourly rate. 

(HOURS WORKED) X (YOUR HOURLY RATE) = PRICE

If you're charging 100 dollars for a painting, and it took you 25 hours to complete, you're only earning $4.00 per hour! YIKES! That's slave labor! Make sure you're at least earning minimum wage when you're just starting out. Your hourly rate can increase with experience and demand. Remember, artists work just like everybody else does! We deserve to be paid! 

For more info on the commission process I now have a new more in depth blog post of the subject! Check it out here: http://www.artnuvogue.com/2013/08/Commissions101.html
 Q: What should I charge for my products and prints on Etsy, shows and street fairs?

1. Do your research! and 2. Use your math skills! First of all research is key- and remembering what you learned in your Economics class is vital! See? Some school stuff does come in handy!
      Find out what the current market price is for products similar to the ones you plan to sell- in other words.... what are other artists selling their prints and products for? Again, keep in mind that the art market is a little more subjective than other products- for example a famous and popular artist like Audrey Kawasaki can sell her prints for hundreds or even thousands of dollars since the demand is SO high and she keeps her supply limited. But just because she sells her prints for that much doesn't mean you or I can. So research artists who have a similar demand (following/fans) as you and see what they charge for the products.

Second step! The yucky math part! Once you have some idea of your product market price, now you need to do a little cost analysis. What does it cost YOU to produce your products? Keep this accurate- from supplies, to shipping costs, and LABOR! Don't forget to calculate your labor costs if you have to produce anything yourself. Labor costs are pretty easy to calculate- simple calculate the TIME it takes you to create your product and multiply that by a fair hourly wage- you can use your area's minimum wage (but don't go lower) or whatever wage you'd like to get paid for your time. Once you know how much it costs you to produce your product then you want to decide on how much profit you'd like to make- that amount is up to you. Add the amount of profit to the production costs and compare it to the market rate. Most likely they won't be too far off. From there you can decide what to charge. Don't forget to add tax if your state requires it- find out the current sales tax rate in your area and be sure to add that to your final prices!

Q: So I've launched a website, blog, Etsy Store, Twitter, Facebook and YouTube channel but I'm not selling anything! HELP!

 A: Don't panic! That's a good start! However, try to keep in mind that just launching yourself on social networks is not the formula for success. First off- Rome wasn't built in a day! I'm still very much a work in progress myself, and certainly launching myself on social networks didn't create overnight success. Quite the opposite at first. It was very slow going. My first year I sold ONE item on Etsy. A tiny little original painting. I really had no idea what I was doing or where things were going back then. 

     Second, remember that what may have worked for me or someone else might not be the right fit for you. Embrace your strengths and what makes YOU and your work unique. If you're uncomfortable in front of the camera and despise video editing- then maybe YouTube is not the right fit for you. Perhaps you'd be more comfortable with a written blog- or quirky Podcast!
     Thirdly- Get out from behind the computer! Many artists HATE to hear this one but it's true. Online exposure is great and everything, and don't get me wrong- it's a powerful and wonderful way to reach people around the world- BUT with that said, there is something invaluable about meeting your potential cliental face to face and creating a persona in your local art community. Research local art fairs/events etc and GET OUT THERE. There is no better way to test market your work and see what the public thinks! You'll also be amazed with the connections and new friends you'll make along the way. People often ask me, how I've gotten into gallery shows and so many art events, and more often than not it's been through someone I met at one of these events. So give it a try!
    Finally! If you still crave more in depth info on launching your own art career- I'm planning on launching a full online course on the subject very soon! So stay tuned for that!

 Q: I found an artist who is doing work VERY similar to mine. What can I do?! 

 A: 
Sadly copying is a fact of life, but it can be quite frustrating at times. I have come across more than a few artists who have taken my style and/or original ideas without providing any credit to me whatsoever. As a general rule- if you are directly inspired by another artist whether it be their style or a concept from a specific piece they did- you MUST credit them! Or better yet! Keep things original by being inspired by other artists, but ultimately creating something unique. If you feel you've been copied there are a few things you can do- but do pick your battles. If you are positive an artist has copied you you may first want to contact this person and start by saying something nice like, "I'm very flattered to have inspired this piece, but please give credit where credit is due by having my name and website clearly available where ever you post your inspired works." If the "copycat" is receptive, then hopefully they will think twice about copying since they know you are aware of them, and they will promptly provide you with proper credits. 

        That being said- if the copycat is attempting to sell work that's very similar (or an exact copy) of yours, you may have a bigger problem and may have grounds for legal action. If this is the case you may wish to speak to an attorney about your rights. Obviously legal action and lawyers do not come cheap, but there are some great websites that offer legal advice to artists if you need advisement (often for free!) Check out: http://www.law-arts.org/, http://www.vlany.org/  and https://www.plagiarismtoday.com/ for more info!


  • Prints, Framing, and Reproduction 
  • Q: How do you prepare your paintings for prints and reproductions?

    A. First things first! You'll need to invest a good quality scanner (I recommend Epson or Canon)- or find a printing company that offers scanning services. For my paintings that are 11"x17" or smaller I scan them myself using a large format Epson scanner. I scan them at 400 to 600 dpi and color correct them using Adobe Photoshop. For larger paintings- or paintings with 3D elements, I photograph them with a Canon T5i DSLR camera and soft box pro lighting set up, like this: (http://www.skaeser.com/photo-video-studio-500-watt-24in-fluorescent-ez-softbox-two-light-kit/) In the past I've also worked with a professional photographer who photographs the paintings in their studio to get a high quality image for prints. There are probably services in your area that offer this if you do some research- or you maybe able to find a photographer on Craigslist or even a friend or student with a really good camera and lighting set up to help you out. 

    Q: Where do you get your frames? 

    I get my frames from many, many different sources. I'm kind of always on the "hunt" for an interesting frame. Many of my frames are vintage. I find them on eBay, Estate sales, thrift & antique stores etc. Some frames I purchase from Aaron Brothers, World Market, Michaels, and Hobby Lobby. I also like a store called Cheap Petes in San Francisco. I do have my Disney works  custom framed by Picture This Framing in Fullerton CA. They do a beautiful job and I'm willing to spend a little more for high end gallery works. More often than not though- I purchase a frame BEFORE I actually have a painting to go in it. I have quite a few frames in stock at any given time. Typically I do my paintings to fit standard frame sizes to make the framing processes easier. Sometimes a frame will even inspire a piece: https://www.youtube.com/watch?v=t-lWJEVSUYE I always recommend investing in quality frames. They boost the value of your paintings and add that finishing touch to your piece!


     Q: Where do you get your prints and reproductions made and how do I do it? 

     A: This is one of my MOST commonly asked questions, yet it requires some research on your part! I do a mix of my own printing and outsource printing. I work with a local printer in San Francisco because I prefer to see and touch the product before selling it. I'm very particular about my colors being correct and accurate. My own printing is done using a Epson Stylus Pro 4900 professional photo printer. I use only Epson's archival (8 cartridge system) inks. For print papers I prefer Iford and Epson brand in their Luster and Satin Pearl finishes. You may wish to experiment with online printers, but I prefer do my own printing and work with real people that understand their services and products. It will be up to you to decide what works best with your individual art work. Watercolor images for example will reproduce very differently than oils, or acrylics, and you want the print paper to feature the medium. It's taken me a long time and a lot of experimentation to get my prints to look the way I want- so don't expect perfection the first go around. Try different papers and talk to the printing company directly if you have questions. For packaging my prints I use a few great sources- one is http://www.clearbags.com/ and the other is http://www.framedestination.com/ Both companies offer great products and everything you need to professionally pack your prints. I'm not a fan of rolling prints in tubes, as I think it damages the print and makes it difficult to frame- so all my prints are supported on foam core and protected in clear bags.


    Q: What type of paper should I use for my prints? 

    A: As far as paper goes, that's entirely up to you and your printer and again it requires you to do some research. There are endless types of paper and brands available and each has a specific purpose and some will better suited to reproduce the medium you work in. Each artist may prefer different qualities in their prints- paper types and textures, sizes, color quality, finishes (matte, glossy, satin, etc). Glossy, Semi-Gloss, and Satin finishes work great with shiny paints like Oils and acrylics, while watercolor, gouache, and pastels reproduce best on matte papers or even watercolor papers. For my prints I prefer Epson and Ilford brand papers with Semi-gloss, Satin, or Luster finishes. I find that they are a nice hybrid between gloss and matte. However, all artists have different preferences to reproduce their own artwork so it's up to you to research and experiment with this to decide what you like best. Ask your printer what papers they have available and if they have samples for you to see and touch. This will help you choose. Always do some test prints before buying prints in bulk!

    5 Random Facts about Leilani Joy
    1. If I could be in any band I’d play the bass for PRIMUS.
    2. My longest running celerity crush is Seth Green.
    3. I can rap the entire song, “Baby’s On Fire,” by Die Antwoord.
    4. I know how to tap dance!
    5. I have an unhealthy obsession with Drag Queens and wish I could be one.